MEMBERS ONLY: To gain full access to the Half Yard Club projects please login or sign up
Beach Hut Doorstop | Beginner-Friendly Sewing Project
Easy |

Quick Links: What you'll need Project steps
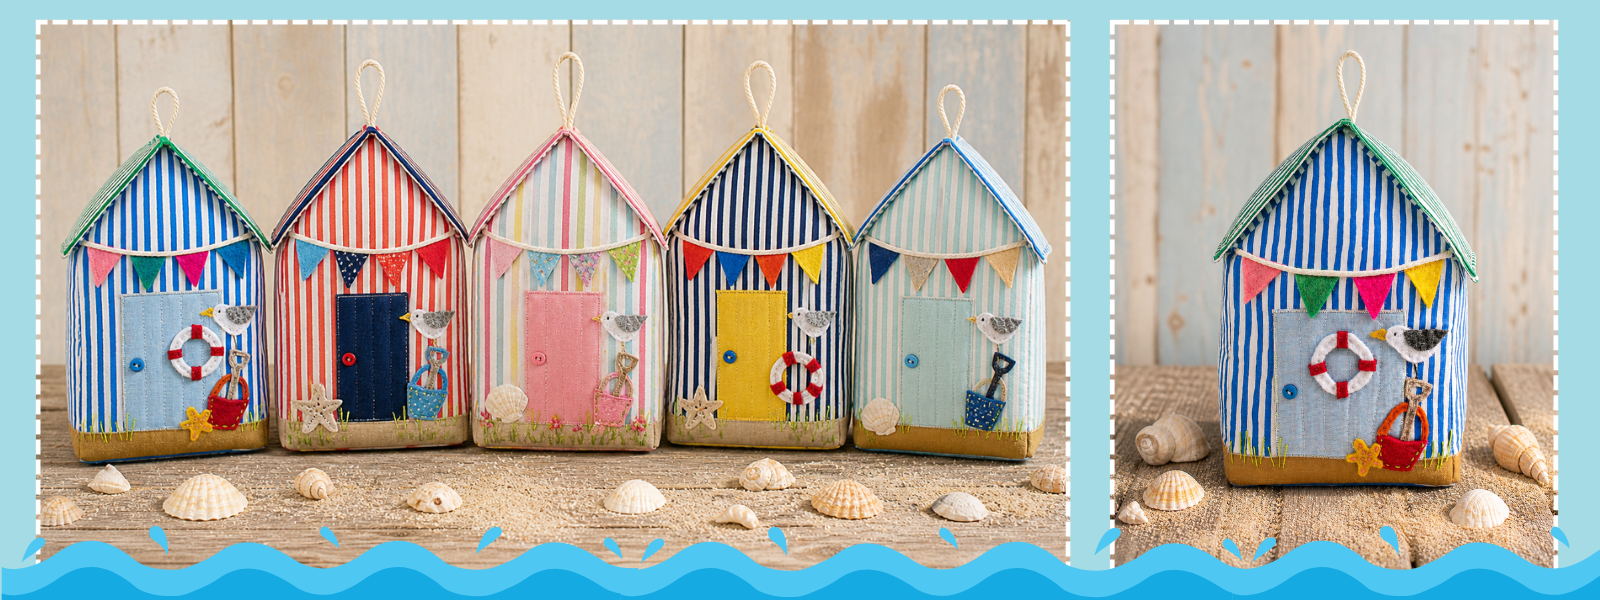
Bring back memories of summer fun on the beach with this fabulous little beach hut. It’s designed as a doorstop, but you can make an unweighted version if you prefer.
This hand-sewn beach hut doorstop has a lovely homemade, coastal charm. It’s both practical and decorative, whether you use it to prop open a door or as a summer ornament, making it perfect for a cosy home or beach-themed room.
I’ve fused craft fleece to the outer pieces to help the hut to keep its shape and prevent puckering when sewing on the appliqué. I’ve left the back and sides of my hut plain, but you could use as many appliqué shapes as you like to decorate all four sides. Felt is perfect for the appliqué as it doesn’t fray – there’s no need to sew around all the edges, and it can even be glued on without sewing at all! The appliqué could be free-motion sewn onto the hut, but this time I’ve chosen to use straight and satin stitches on my sewing machine, with a little hand sewing too. I’ve used three strands of embroidery thread to decorate my bucket and star fish, and regular thread for the rest of the appliqué. If you’re using your beach hut as a decoration you probably won’t need to weight it but if using it as a door stop, add a bag of pellets, pebbles or even rice to make the hut heavy. There’s a zip-up opening on the underside of the hut so you can remove the weighed pouch or refresh the stuffing, if desired. The space inside for the pouch can double up as a secret storage pocket, too!Make it your own!
- Refer to the photo above to see how you can play with the fabric colours and positions of the felt pieces to make the beach hut of your dreams.
- Have fun with the decorations, choosing your own stitches for the embroidery, adding embroidered flowers around the door or glueing on small decorations such as shells or charms.
- Try adding a wider door to your beach hut or a narrow door with a shuttered window, or swap out some of the felt shapes for others – you could, for example, have a heart instead of the life ring.
You may also like:
- Quick Make: Quaint Cottage Pincushion
- Wonky Beach Hut Bag
- Stash Busting Bunting
- Embroidered Chicken Oven Mitts
- Wonky Street House Doorstop
- Sewing machine with a standard and buttonhole foot
- Scissors
- Pins and/or fabric clips
- Strong wet fabric glue: I used Gutermann HT2
- Point turner or chopstick
- Erasable fabric pen
- Optional: basting spray or a little fusible webbing (Bondaweb or Heat n Bond) to attach the door
- Optional: fabric glue pen to help secure the ‘sand’ to the hut walls before you stitch
- Optional: seam roll to help with pressing
- Optional: buttonhole chisel or seam ripper
- 44 x 10in (112 x 25.5cm) strip of striped fabric for the hut walls
- 20 x 5in (51 x 13cm) strip of contrast striped fabric for the outer roof – the direction of the stripes on the fabric is up to you
- 44 x 15in (112 x 38cm) piece of fusible craft fleece
- Scraps of brightly coloured felt for the appliqué including grey and white for the seagull, white and red for the life ring and yellow for the star fish
- 3 x 4in (7.5 x 10cm) rectangle of fabric for the door
- 28 x 1in (71 x 2.5cm) strip of sand-coloured fabric
- 7in (18cm) zip
- 15in (38cm) of ¼in (5mm) wide piping cord or string for the bunting and top loop
- Small button for the door handle
- Green, peach (or red) and yellow embroidery threads – or other colours, as desired
- Sewing threads as needed, including black for the seagull
- Toy filler
- 12 x 5in (30.5 x 13cm) piece of scrap fabric, an elastic band and some pellets, rice or pebbles for the weight pouch
To cut: - Two house shapes from your pattern for the front and back pieces
- Two 4½ x 6in (11.5 x 15.25cm) rectangles for the sides of the hut
- 4½ x 6in (11.5 x 15.25cm) rectangle for the base
- Two 4½ x 4½in (11.5 x 11.5cm) rectangles for the inner roof
- Two 10 x 5in (25.5 x 13cm) rectangles for the outer roof from your contrast striped fabric (one for the top of the roof and the other as a lining)
Finished size: 5½ x 8½ x 4in (14 x 21.5 x 10cm).
Note: use a ¼in (5mm) seam allowance.
MEMBERS ONLY: To gain full access to the Half Yard Club projects please login or sign up
You will need:
Equipment
Materials
MEMBERS ONLY: To gain full access to the Half Yard Club projects please login or sign up
Project steps:
Step 1
This is content that only logged members can see! Please create an account or login to be able to view project steps, otherwise you'll be limited to non-member content.
This is content that only logged members can see! Please create an account or login to be able to view project steps, otherwise you'll be limited to non-member content.
Step 2
This is content that only logged members can see! Please create an account or login to be able to view project steps, otherwise you'll be limited to non-member content.
This is content that only logged members can see! Please create an account or login to be able to view project steps, otherwise you'll be limited to non-member content.