


MEMBERS ONLY: To gain full access to the Half Yard Club projects please login or sign up
Christmas Cushion Cover | Video Tutorial + Template Download | Intermediate Sewing Pattern
Moderate |

Quick Links: What you'll need Project steps
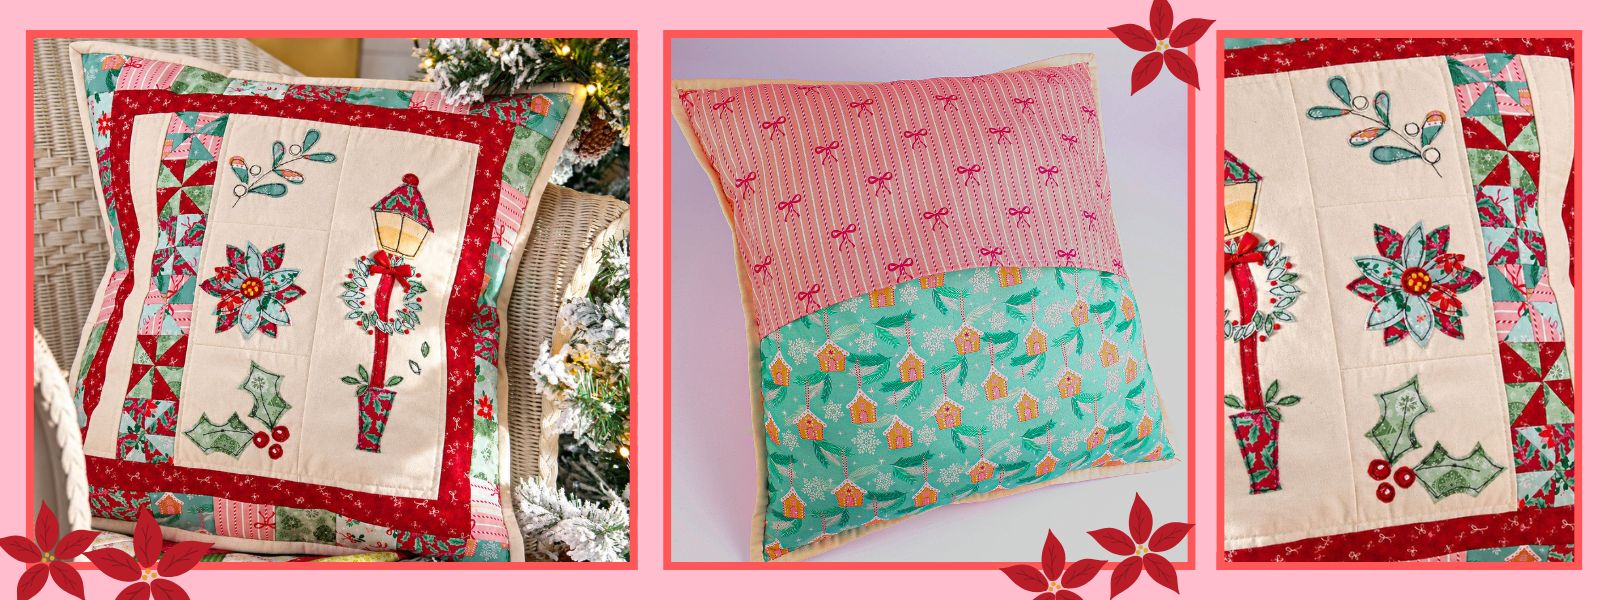
Showcase your sewing skills with this colourful cushion which combines two types of patchwork, machine appliqué, quilting and a little hand embroidery.
This cosy Christmas patchwork and appliqué cushion cover features a mix of festive fabrics, simple pinwheel patchwork and seasonal appliqué. I’ve used free-motion stitching for my appliqué shapes, but you could hand sew or use a straight stitch on your sewing machine. You will have plenty of fabric left to add more appliqué shapes to the back of your cushion cover too, if you wish. Make sure to read the tips below before starting your project.
Fabric choices:
There are some important things to bear in mind when selecting the fat quarters for this project:
All six fabrics are used for the pinwheels, and for the pinwheels to show up properly there needs to be a good contrast between the two fabrics used for each one. Pair up the fabrics so you have three sets, each with a light and a bright/dark fabric or with a strong colour contrast.
You’ll want at least one red fabric for the poinsettia and berries – and because it’s Christmas!
You’ll want at least one green fabric for the leaves.
Two of the fabrics are also used for the cushion back. You will still have enough leftover fabric for the pinwheels and patchwork border, but you will need to cut carefully. Alternatively, choose additional fabrics for the back.
The inner border looks best if it isn’t in one of the five fabrics used in the patchwork border, so choose this before cutting the border strips.
You don’t have to limit yourself to six patterned fabrics – this is a chance to use up fabric scraps.
Tips for the appliqué:
- Use interfacing on the wrong side of fabrics to be embroidered to help prevent puckering.
- When free-motion sewing on the machine with a straight stitch, work around the appliqué shapes a couple of times to create a ‘scribbly’ look.
- Avoid placing the appliqué shapes too close to the ¼in (5mm) seam allowances.
- If using Bondaweb/Heat N Bond for the first time, trace your pattern pieces straight onto the paper side of the sheet – there’s no need to cut out the paper pattern pieces first. Cut out the Bondaweb shapes with a small margin all round, ready to iron onto your fabric.
- Don’t use a heat-erasable pen to trace the patterns or when you iron the Bondaweb to the fabric the cutting lines will vanish.
- Iron the rougher side (adhesive side) to the wrong side of your fabric, scratch the paper backing with a pin to make a hole then peel away the paper. Position the appliqué shapes, and when you’re happy with the design, iron them in place. Your shapes will be mirror images of the patterns. Now you can cut out the shapes along the outlines.
- As the wreath leaves are so small it may be difficult to remove the backing paper of your Bondaweb, so if you’re confident in hand drawing the shapes, fuse some Bondaweb to the back of your fabric, peel away the backing and then hand draw the leaf shapes on the fabric before cutting.
- When the appliqué shapes are sewn, they may fray a little around the edges, which gives a shabby-chic look to the cushion.
Make it your own!
- Use coloured fabric as the background for each appliquéd section.
- If hand embroidery is your forte, show it off by adding more to any of the appliquéd sections or even replace an appliquéd section with an embroidery.
- Add more quilting to the cushion front, either working by hand or on the machine.
By the end of this project, you’ll have:
- Learnt to make pinwheel blocks.
- Made a strip-pieced patchwork border.
- Had fun with free-motion embroidery.
- Done simple machine quilting.
- Worked some hand stitching and embroidery.
You may also like:
- Winter Christmas Wonky Street Cushion Cover
- Christmas Table Runner & Placemat Set
- Appliqué Advent Calendar
- Easy Christmas Stocking Sewing Pattern
Finished size: 9½in (49.5cm) square.
For best results, follow the inch measurements as the metric equivalents have been rounded up or down slightly.
MEMBERS ONLY: To gain full access to the Half Yard Club projects please login or sign up
You will need:
Equipment
- Sewing machine with a standard and/or ¼in (5mm) foot
- Pencil or erasable fabric pen for drawing the templates (not heat-erasable for this)
- Erasable fabric pen for other markings (I used a heat-erasable pen)
- Scissors
- Quilting ruler, rotary cutter and cutting mat
- Sewing pins
- Optional: fabric clips
- Optional: 1in (2.5mm) bias-binding maker
- Optional: tweezers
- Optional: spray starch
Materials
- 25 x 19in (63.5 x 48cm) of background fabric (cream/calico)
- Six fat quarters of complementary fabrics (these will be paired up and stitched together in the pinwheels, and you want good contrast between the two fabrics for each pair)
- 3in (7.5cm) square of cream fabric for the lamp section of the lamp post – you can cut this from your background fabric if you wish
- 15 x 6in (38 x 15cm) of Bondaweb
- 20 x 15in (51 x 38cm) of lightweight fusible interfacing for the appliqué shapes– I used 28g (1oz)
- 19½in (49.5cm) square of fusible wadding – I used H640 but you could use an 80/20 wadding if you prefer
- 6in (15cm) of ¼in (5mm) wide ribbon to make the wreath bow (or use the bow pattern to cut yours from fabric)
- White embroidery thread
- Yellow embroidery thread
- Red embroidery thread
- Yellow alcohol-ink pen
- 18in (45cm) square cushion pad
To cut:
- Two 20 x 14in (51 x 35.5cm) rectangles of fabric for the back of the cushion – cut these pieces first
- 1½in (4cm) strips for the inner frame/border: you’ll need two strips about 12½in (31.75cm) long for the sides and two about 14½in (37cm) long for the top and bottom but it’s best to cut them longer than you need and trim them to fit
- Five 2½in (6.5cm) strips for the patchwork border, cut from the fabric you didn’t use for the inner frame/border and cut parallel to the longest edge of your fat quarters
- Four 2in (5cm) squares from each of your patterned fabrics for the pinwheels (24 squares in total)
- 2 x 12½in (5 x 31.75cm) strip of background fabric
- 5 x 12½in (13 x 31.75cm) strip of background fabric
- Three 5in (13cm) squares of background fabric
- 82 x 2in (209 x 5cm) strip of background fabric for the binding (cut four 2in (5cm) strips across the width of your fabric and join them together – see step 29)
MEMBERS ONLY: To gain full access to the Half Yard Club projects please login or sign up
Project steps:
Step 1
This is content that only logged members can see! Please create an account or login to be able to view project steps, otherwise you'll be limited to non-member content.
This is content that only logged members can see! Please create an account or login to be able to view project steps, otherwise you'll be limited to non-member content.
Step 2
This is content that only logged members can see! Please create an account or login to be able to view project steps, otherwise you'll be limited to non-member content.
This is content that only logged members can see! Please create an account or login to be able to view project steps, otherwise you'll be limited to non-member content.

