MEMBERS ONLY: To gain full access to the Half Yard Club projects please login or sign up
Debbie Shore's Dressmaking Studio: Quilted Gilet Pattern
Moderate |

Quick Links: What you'll need Project steps
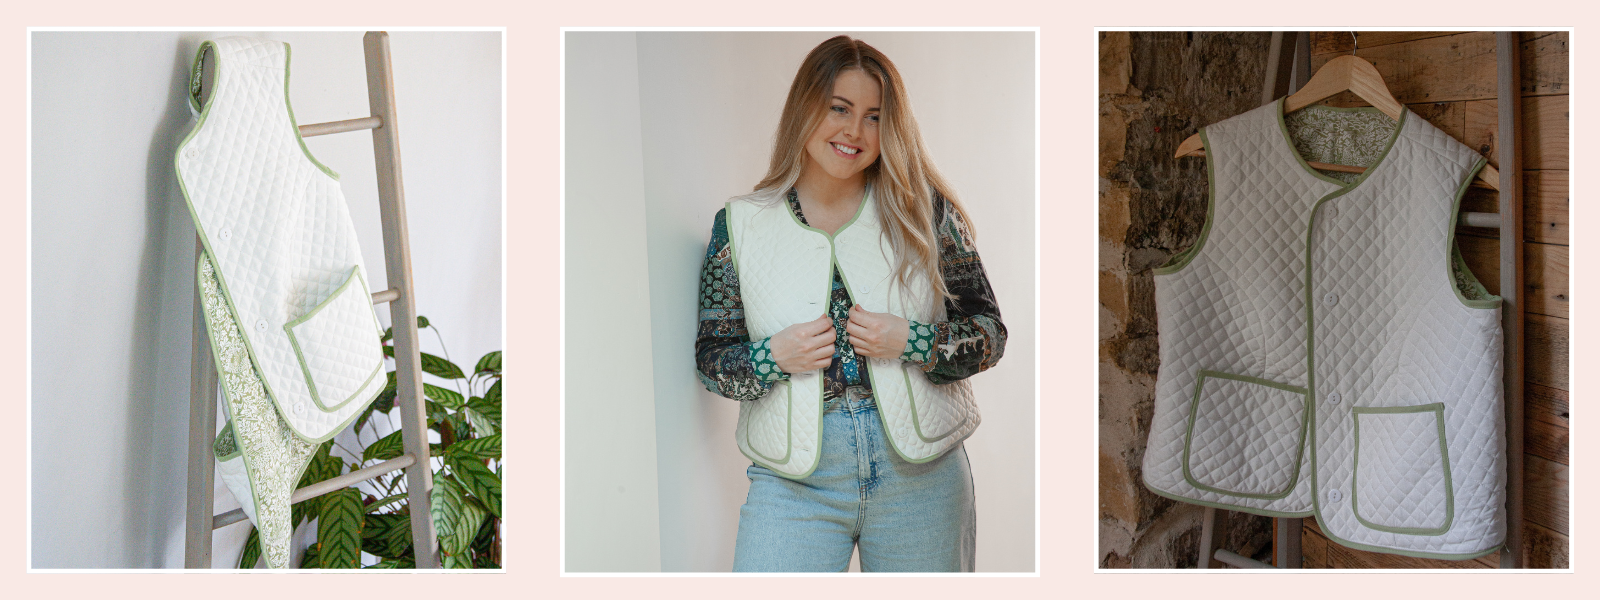
This short quilted gilet is a practical garment that will be a staple in your wardrobe. It has a slim fit, with bound edges, a button-up front and patch pockets.
About the project
This gilet comes in two size sets. The first set is designed for sizes 4–18 with a B-cup and the second set is for sizes 16–32 with a D cup. To accommodate the larger bust size, the second set has the addition of princess seams. If your size is 16 or 18, choose from the appropriate set. There are two types of pre-quilted fabrics that you can use for the gilet: single-sided or double-sided versions. The single-sided fabric has a pretty fabric on one side and the wadding is exposed on the other side, while the double-sided version has fabric on both sides. Often the exterior fabrics are cotton or a cotton mix, but you can also get fabrics with fleece or fake fur on one side and a durable exterior fabric on the other side. If you are using single-sided fabric you will need to line your gilet. I used a medium-weight cotton fabric for the lining of the gilet shown in the video. As with any dressmaking pattern, it’s always a good idea to make a sample or toile in an inexpensive fabric that’s as close as possible to your final choice before you cut into a more expensive fabric. This helps you understand the fit and how the garment will sit on the body, and it allows you to make any necessary adjustments before sewing your final version.Seam finishing
Single-sided quilted fabric
Because your gilet will have a separate lining if using this fabric, the seam allowances won’t show, so if you want to avoid having to overlock or bind the seams, this is a good option to choose. Simply press the seams open.Double-sided quilted fabric
Your seam allowances will be on show inside the waistcoat. If you have an overlocker (serger), you can use this to neaten them up. If not, see the video where I show you how to cover them in binding. Note that this is a bit tricky on the version with princess seams because of the curves, so if you are a beginner, you will find it easier to make a lined gilet.Want to make it even simpler?
- The gilet is designed to be buttoned, but if you don’t like doing buttonholes, you can leave off the buttons and buttonholes altogether or add ties instead.
- Omit the bound patch pockets. If you like, you can add a simple patch pocket to the inside instead.
Want to make it longer?
The gilet is designed to sit between waist and hip. If you’d feel more comfortable in a longer version, or if you’d like to make a short and a long version, you can adjust the length as described in step 19. Remember that if you do decide to lengthen the gilet you will probably require more fabric.
Make it your own!
- Quilt your own fabric for the gilet: simply choose fabric for both sides, pin them wrong sides together with wadding in between and then stitch all over the fabric with parallel lines about 1–3in (2.5–7.5cm) apart. You can quilt in a cross grid or in diagonal lines to created quilted diamonds if you wish.
- Use a thick coating fabric or fleece instead of the pre-quilted fabric.
- Make it reversible by choosing an attractive fabric for the lining and omitting the buttons and buttonholes. If you do this, think about whether you want to put pockets just on your favourite side or perhaps have one on each side.
By the end of this project, you’ll have:
- Made a stylish quilted gilet that you can wear indoors and out.
- Learned how to sew with pre-quilted fabrics.
- Developed your binding skills.
- Made some stylish bound pockets that you could add to other garments too.
The Templates
Size charts are included on the template pages. There are six options to choose from:
- Click here to download the A0 pdf pattern for sizes 4–18 (B cup)
- Click here to download the A0 pdf pattern for sizes 16–32 (D cup)
- Click here to download the A4 size pdf pattern for sizes 4–18 (B cup)
- Click here to download the A4 size pdf pattern for sizes 16–32 (D cup)
- Click here to download the US Letter size pdf pattern for sizes 4–18 (B cup)
- Click here to download the US Letter size pdf pattern for sizes 16–32 (D cup)
Check out the gilets that other members have made for inspiration (see right) and, if you have any questions about making this pattern, you can always refer to the forum. You can also chat to other members via the Half Yard Sewing Club Facebook page!
Note: use a ⅜in (1cm) seam allowance unless otherwise stated.
MEMBERS ONLY: To gain full access to the Half Yard Club projects please login or sign up
You will need:
Equipment
- Sewing machine with a standard foot
- Dressmaking scissors
- Buttonhole cutter and cutting mat or a small very sharp pair of scissors for opening the buttonholes
- Pins
- Fabric clips (since the fabric is quite thick)
- Erasable fabric marker to transfer pattern markings
- Printer paper and tape if printing the pattern at home
- Optional: tailor’s ham for pressing the princess seams
Materials
- 59in (150cm) wide pre-quilted fabric: ¾yd (60cm) for sizes 4–12 (B cup); 1yd (70cm) for sizes 14–18 (B cup); 1¼yd (1m) for sizes 16–22 (D cup); 1¼yd (110cm) for sizes 24–32 (D cup) OR for 54in (137cm) wide fabric: ¾yd (60cm) for sizes 4–12 (B cup); 1yd (70cm) for sizes 14–18 (B cup); 1¼yd (110cm) for sizes 16–22 (D cup) or 1½yd (120cm) for sizes 24–32 (D cup)
- Lining fabric (if you are lining your gilet): the same amount as for the pre-quilted fabric for your size
- 1in (2.5cm) wide double-fold (standard) bias binding – up to 6½yd (6m) for sizes 4–18 and up to 7yd (6.5m) for sizes 16–32
- Four ½–5/8in (15–18mm) buttons
MEMBERS ONLY: To gain full access to the Half Yard Club projects please login or sign up
Project steps:
Step 1
This is content that only logged members can see! Please create an account or login to be able to view project steps, otherwise you'll be limited to non-member content.
This is content that only logged members can see! Please create an account or login to be able to view project steps, otherwise you'll be limited to non-member content.
Step 2
This is content that only logged members can see! Please create an account or login to be able to view project steps, otherwise you'll be limited to non-member content.
This is content that only logged members can see! Please create an account or login to be able to view project steps, otherwise you'll be limited to non-member content.