MEMBERS ONLY: To gain full access to the Half Yard Club projects please login or sign up
Quilt Block Patchwork Bag | PDF Download | Step-By-Step Tutorial
Moderate |

Quick Links: What you'll need Project steps
If you thought that blocks were only for making quilts, then this project – a stunning shoulder bag – will make you think again.
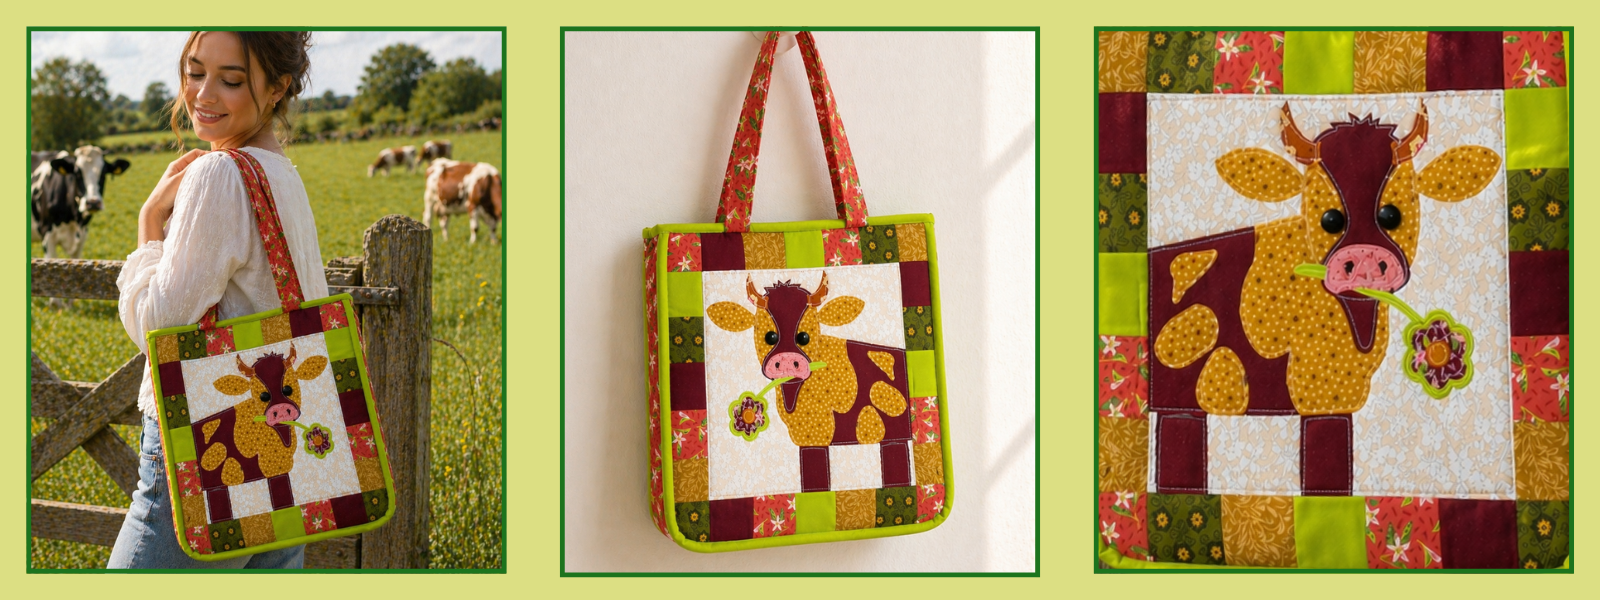
This charming bag has a warm, country-craft feel. The main feature on the front is a playful appliqué of a cow: Block 3 of this year’s block of the month. Surrounding the central panel is a patchwork border made up of 2½in (6.5cm) fabric squares in coordinating prints: I’ve tried to match as closely as I can the colours of the appliqué, but of course you can make the block and border in any colours you like – pastels, brights, patterned fabrics or plain! I’ve also included a little patchwork on the back of the bag, using more 2½in (6.5cm) fabric squares, and added a patchwork pocket inside the bag too!
Sizing
- This bag would work with any block you choose, provided it can be trimmed to 10½in (26.5cm) square. The Highland Cow block is 12½in (31.75cm) square but I wanted to focus in on the cow, so I omitted the Fab G strip at the bottom (the grass) and trimmed the sides.
- If you would like to use a full-size 12½in (31.75cm) block, such as Block 2, EPP Butterfly from the 2026 quilt or Block 8, Folded Corners from the 2025 quilt, you could make a bigger bag, adding one extra 2½in (6.5cm) square to each of the border strips or you could use 1½in (3.75cm) wide fabric strips instead of the border squares to maintain the existing size of the bag. If you make the bag bigger, remember to cut the gusset longer too.
- If you have a single favourite quilt block, whatever size it is, you can still turn it into something really satisfying and useful. Think of it less as a ‘quilt block’ and more as a feature panel you can build around.
- Cushion cover: Add a border (or two) around the block and turn it into a statement cushion.
- Tote-bag panel: Use the block as the front of a tote bag and pair it with simple fabric on the back, a coordinating lining and some sturdy handles. Add a border to make the block bigger if needed.
- Zip pouch: Frame the block with coordinating fabric and sew it into a cosmetic or notions pouch.
- Wall hanging: Add borders, wadding and backing, basically making a mini quilt for decoration.
- Table topper: Add borders until it fits the centre of a table. Add wadding, backing and binding, just as when making a small quilt.
- Chair-pad cover: Use the block as the top panel for a padded seat cushion. You may need to interface the block to make it stronger.
- Book cover or tablet sleeve: A perfect project for a smaller block.
- Pocket detail on a jacket or shirt: A quilt block makes a standout patch pocket – again, a nice idea for a smaller block.
- There’s plenty of opportunity to personalize this bag with your choice of fabric for every part of the bag or by using a different quilt block on the front.
- Add more pockets to the inside of your bag – there are lots of bag projects at the Half Yard Club that will tell you how.
- Use ready-made bag handles and bag hardware if that suits your look.
- Learned how to make bias binding from a fat quarter of fabric.
- Made a patchwork pocket that could be added to any bag.
- Upped your bag-making skills.
- Sewing machine
- Equipment for making your chosen block: see Block 3 of this year’s block of the month
- Basting spray such as 505
- Erasable fabric marker pen
- Pins
- Fabric clips – the foam can be tricky to pin
- 3in (7.5cm) circle template to help you round off the bottom corners of the bag – the template size doesn’t have to be exact
- Ruler (preferably a long quilting ruler)
- Fabric for your quilt block (see BOTM 2026, Block 3)
- 44 x 30in (112 x 76cm) of fabric for the bag back and lining
- 44 x 20in (120 x 51cm) of single-sided foam stabiliser single-sided foam stabiliser
- Two 28 x 4in (71 x 10cm) strips of fabric for the handles
- Two 28 x 4in (71 x 10cm) strips of medium-weight interfacing for the handles
- 44 x 4in (118 x 10cm if using metric measurements) of outer fabric for the bag gusset (if you need to join fabric, make the seam in the centre of the strip)
- 19½ x 19½in (50 x 50cm) of fabric for the binding (you should be able to cut this from a fat quarter)
- Five 2½ x 25in (6.5 x 65cm) fabric strips for the patchwork squares – sub-cut each one into ten 2½in (6.5cm) squares for the patchwork border
Patchwork squares
You’ll need fifty 2½in (6.5cm) squares for this bag: 24 for the bag front, 14 for the bag back and 12 for the inner patch pocket. I cut these from five different fabrics, but you can use more fabrics if you wish to use up some of your smaller fabric scraps or even make use of any leftover squares from a mini charm pack.Other ideas for using quilt blocks
Make it your own!
By the end of this project, you’ll have:
You may also like:
Finished size: 14½ x 15 x 4in (38 x 40 x 10cm if following the metric measurements)
Note: Use a ¼in (5mm) seam allowance. Because the metric conversions have been slightly rounded up or down, if you make your bag using metric measurements it will be a little bigger than the one show. Stick to either inches or centimetres for the whole project – if you mix and match the pieces won’t fit!
MEMBERS ONLY: To gain full access to the Half Yard Club projects please login or sign up
You will need:
Equipment
Materials
MEMBERS ONLY: To gain full access to the Half Yard Club projects please login or sign up
Project steps:
Step 1
This is content that only logged members can see! Please create an account or login to be able to view project steps, otherwise you'll be limited to non-member content.
This is content that only logged members can see! Please create an account or login to be able to view project steps, otherwise you'll be limited to non-member content.
Step 2
This is content that only logged members can see! Please create an account or login to be able to view project steps, otherwise you'll be limited to non-member content.
This is content that only logged members can see! Please create an account or login to be able to view project steps, otherwise you'll be limited to non-member content.