MEMBERS ONLY: To gain full access to the Half Yard Club projects please login or sign up
How To Draw Your Own Skirt Block | Jenniffer Taylor | Photo Tutorial
To make your very own Kate skirt pattern with Jenniffer Taylor, start by drawing a basic skirt block. Follow these step-by-step photos, and you’ll see just how simple it is to lay the foundation for your perfect skirt.
To start with you are going to need five basic body calculations:
» Your waist calculation: your waist measurement divided by 2
» Your hip calculation: your hip measurement divided by 2
» Your waist to hip measurement
» Your waist to length measurement
» Your balance factor: 2.5cm (1in)
We are going to be drawing your basic skirt block into a square/ rectangle shape. Within the square you will have both the front and back part of your skirt.
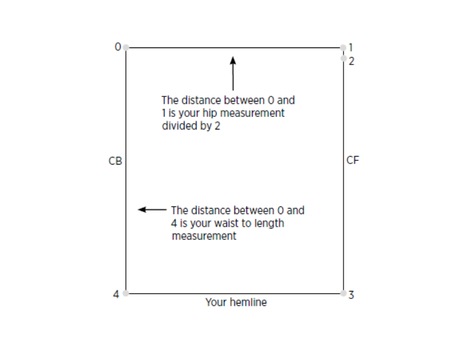
2. In the top left-hand corner, mark point 0.
3. Draw a line across to the top right-hand corner using your hip calculation. This is point 1.
4. With the right-angle on your pattern master, square down from point 0 using your waist to length measurement to create point 4 (this line will be your centre back), and from point 1 to create point 3 (this line will be your centre front).
5. Join points 3 and 4 together to create your hemline. Double-check the distance is correct – it should be the same as from point 0 to point 1 (your hip calculation).
6. Along the line between points 1 and 3, mark out your balance factor measurement: point 2.
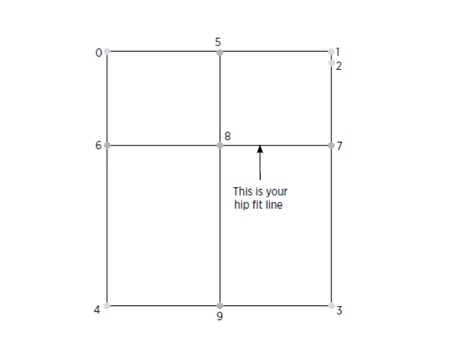
7. Along the line between points 0 and 4, mark out your waist to hip measurement to create point 6.
8. Along the line between points 1 and 3, mark out your waist to hip measurement to create point 7 – the line between points 6 and 7 is your hip fit line.
9. Mark the centre point of the hip fit line as point 8.
10. Mark the centre point of the line between points 0 and 1 to create point 5, then mark the centre point of the line between points 4 and 3 to create point 9. Draw a line through to connect points 5, 8 and 9.
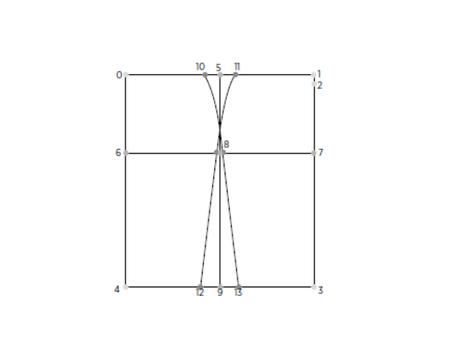
11. To create points 10 and 11, measure out twice the balance factor, either side of point 5.
12. To create ease around the hipline, take your hip calculation and add 2.5cm (1in) before dividing by 2. Measure out from point 6 towards point 7 and mark this measurement. Repeat from point 7 towards point 6. You will have created a mark either side of point 8.
13. From point 9, measure 5cm (2in) to the left to create point 12 and repeat on the other side to create point 13.
14. Using your tailor’s curve, draw a curved line that joins point 10 with the mark just to the right of point 8.
15. From this point, continue to draw down to point 13 using a straight line.
16. Using your tailor’s curve, draw a curved line that joins point 11 with the mark just to the left of point 8. From this point, continue to draw down to point 12 using a straight line.
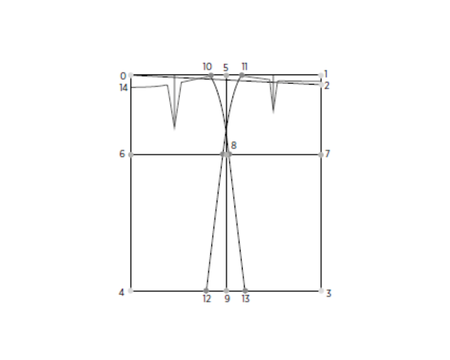
17. Add 5mm (¼in) to the balance factor and measure down from point 0 to create point 14.
18. To create the shape of the skirt top, connect point 14 to point 10 using your tailor’s curve. Repeat to connect point 11 and point 2.
19. Measure between points 0 and 10 and points 11 and 1 and add the two measurements together. To find the surplus amount, work out the difference between this calculation and half your actual waist measurement before subtracting 1cm (3/8in) to allow for ease.
20. Using the surplus calculation, we need to create two dart measurements: one-third for the front dart and two–thirds for the back dart. Find the mid-point between points 0 and 10 and square down about 13cm (5in) to create the point of the dart. Distribute your back dart calculation (two-thirds of your surplus) where the square down meets the curve.
21. Find the mid-point between points 1 and 5, and this time square down 9cm (3½in) for the point of the dart. Distribute your front dart calculation in the same way.
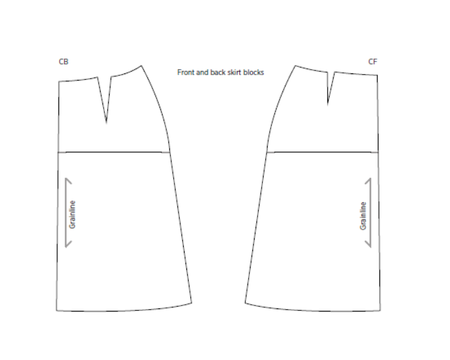
22. You have now finished drafting your skirt block. To make tracing off easier, use your coloured felt pens to highlight the front and back skirt patterns. Trace off the front and back skirt patterns individually, so they no longer cross in the centre of the square. Mark out clearly the centre front (CF) and centre back (CB), hipline, dart positions and finally the grainline, which is parallel to your CF and CB.
This tutorial has been extracted from Your Skirt, Your Way by Jenniffer Taylor. In this title, Jenniffer will show you how to design and sew your own gorgeous, unique skirts, with no need for shop-bought patterns. Start by creating your own block and toile using just four body measurements. Then select your skirt shape, add the fittings, fastenings and details you want, and put the whole thing together with ease.
Don’t forget – you can enjoy 30% off Your Skirt, Your Way with your exclusive member discount code.
This is content that only logged members can see! Please create an account or login to be able to view project steps, otherwise you'll be limited to non-member content, which is no fun at all!
This is content that only logged members can see! Please create an account or login to be able to view project steps, otherwise you'll be limited to non-member content.
MEMBERS ONLY: To gain full access to the Half Yard Club projects please login or sign up